There are many reasons why we have meetings at work, and they come in various shapes and sizes. Some of the most common ones are for decision making, problem solving or discussing innovations.
These specific types of meetings involve high levels of collaboration and they generally only have a handful of participants, following the Jeff Bezos rule that two pizzas should be enough to feed everyone involved in any meeting.
As Microsoft Teams is a collaboration tool, the designers had these kinds of interactions in mind when they set-up the meeting defaults, with everyone having the same access and collaboration rights. That’s all very well, but how do we manage meetings in Teams when there are more than just a handful of attendees?
Think big
With status update meetings, for example, the number of participants can easily swell to over 50, although the level of collaboration drops massively. With a small number of these individuals presenting to the group, the etiquette and rules in this type of meeting need to be different.
Then we have information sharing meetings which can involve literally hundreds of people, but with only a handful presenting. The way in which these conference-style meetings are managed needs to be different again. After all, not everyone would be contributing at these kinds of meetings in a physical space, so why would you enable them to do so in the digital space?
So, as the number of participants in a meeting increases it would be true to say that the level of collaboration reduces exponentially.

Roles in a digital meeting
In small meetings, roles can be quite informal with maybe just the host and their guest. As meetings grow, the roles start to become more defined:
- Host: The person who has called the meeting
- Presenters: Those invited to present
- Note-Taker: The individual responsible for recording the minutes of the meeting
- Attendees: Involved more passively, although may still make contributions
Everyone understanding their role in a big meeting in a physical space enables it to run effectively. Within Microsoft Teams, these roles have been replicated so large online meetings can run equally smoothly.
The host or organiser is the person who sent out the invite for the meeting. They will assign a note-taker to ensure the smooth running of the session. The host should also decide the presenters and attendees, based on the meeting’s agenda.
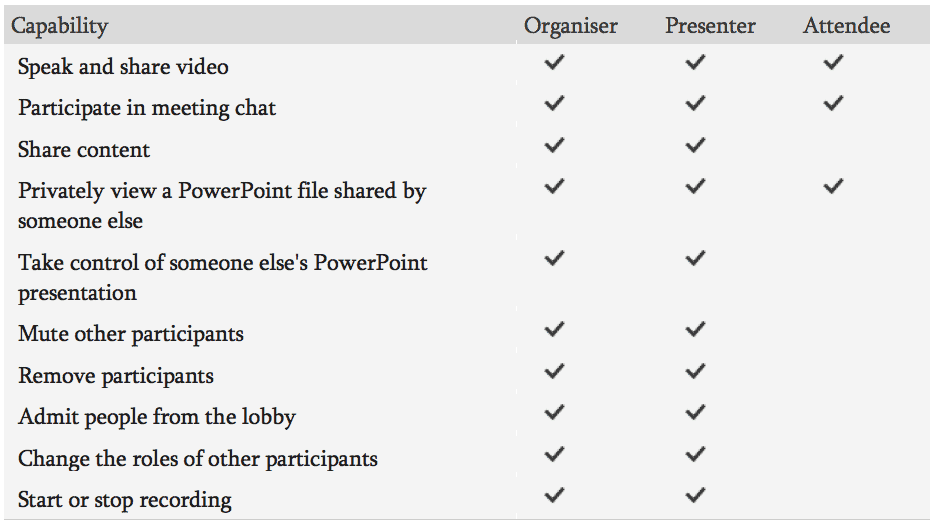
A presenter has the capability to share their screen at any point. They can also mute anyone in the meeting and lower people’s hands. This is one of the reasons you do not want everyone to be a presenter, by default. In the same way that you wouldn’t want ten people walking onto the stage just as the keynote speaker has started in a conference hall.
Here is a graphic breakdown of the different roles and their powers:

Setting the correct roles before and during the meeting
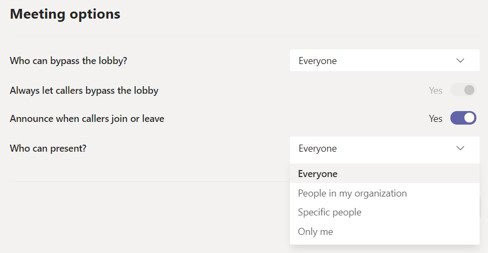
It’s best practice with large meetings to set the roles up beforehand, as that leaves you to focus on more important matters from the start rather than the admin. Before you set the roles, you need to create the appointment and send it out in either Outlook or Teams. This creates the event on the Microsoft servers of everyone invited. You can then go to either the ‘meeting options’ just below the meeting link in the appointment or the new tab at the top inside the appointment in Teams:

Click on this and it will open a webpage with the meeting details. Please note that you need to be logged into office.com in your browser for this to work:

The first field allows you to select who can bypass the lobby on entering. For non-sensitive meetings I set this to ‘Everyone’.
The two fields around ‘callers’ are for people who come into the meeting using a telephone rather than VOIP. It’s worth noting that this feature might not be available to you as it is an optional extra.
Moving on to the key ‘presenter’ options, ‘Everyone’ is the default setting and you will see you can restrict this list down to just yourself. Please note that when using the ‘specific people’ option, you can only nominate individuals within your organisation who have been included on your invite. If you want someone outside your organisation to present, you can only organise this after you start the meeting but it’s quite simple to do.
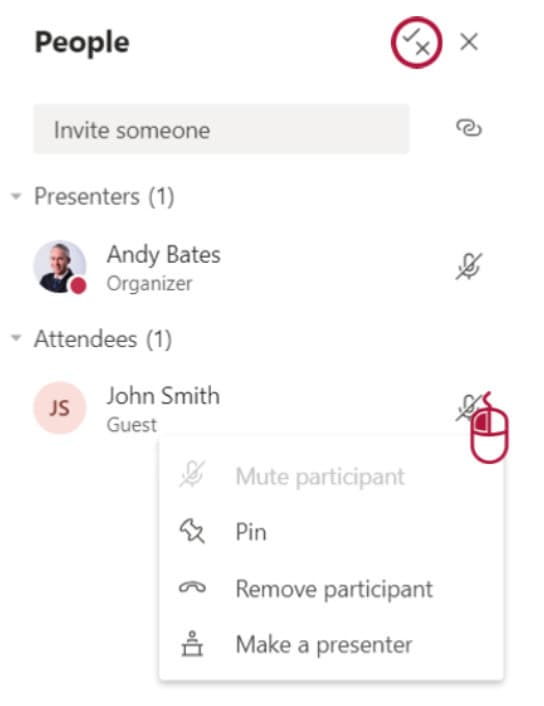
When the meeting is live, you can control who is a presenter and who is an attendee in the ‘Participant’ panel. Below, you can see John Smith has been added as a ‘guest’ attendee. To change John’s role, simply click on the three dots hidden under the microphone mute symbol to reveal further options. From here, you can transform him into a presenter.

Alternatively, you can still go into the meeting options by selecting the ‘tick/cross’ icon circled in the top right. This will send you to the meeting options we saw before.
Any changes you make will work instantly across the meeting. So, if you forgot to set everyone as an attendee you can do it without having to change the status of each person individually.
The importance of the note-taker
In the digital world, the traditional note-taker can have other roles too. Although I would actually recommend removing the ‘note-taking’ and record the meeting instead as this saves someone from having to do this tedious task. Besides, if you need a transcript you can copy this straight out of Stream, providing you check for possible typos.
That leaves the note-taker free to focus on more important things such as the agenda, key discussions and agreed actions. It makes sense to use them as the presenter too so that they have all the controls and take on other important roles too:
- Managing the admittance to the meeting from the lobby, especially if you are expecting a lot of external users
- If the meeting is confidential you may want the note-taker to monitor the people in the meeting to ensure they are all meant to be there!
- Manage the Presenters and Attendees roles
- Help with managing the chat for Q&A, issues or monitoring the ‘hands up’
- General help and support for users having technical issues
- Muting participants who are creating background noise
- Keeping the meeting on time and summarising the key action points at the end
All these roles will help to maintain a good structured meeting, regardless of how many attendees there are.
Have a good meeting!
Remember that Microsoft Teams is set-up by default for small collaboration-based meetings. As the number of people in the meeting increases, the amount of collaboration decreases. So, while it’s great to have a free-for-all with small meetings, this is not practical for larger ones. This means that you need to assign actual roles to the key people in the meeting and look at the options more closely.
Following these guidelines, you can use Microsoft Teams for meetings of up 250 people which is the current limit at the time of writing. Obviously, this kind of meeting is going to be an information update with very little collaboration at all.
If you need more people ‘in the room’, try Teams Live Events for up to 10,000 people. As you can imagine, managing a meeting of that size can be a different challenge altogether!


